Wednesday, December 31, 2008

Finished Buffalo Bone Gourd Rattle


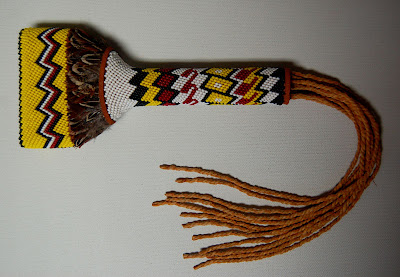
I am posting photos of the finished Buffalo Bone Gourd Rattle.

A photograph of the whole rattle finished, a photo of a close up of the beading on the front part of the handle, a photo of a head on look at the rattle and finally a photo of the beading at the rear of the handle( note: the four zig-zag colored lines you see are the Apache colors for the Four Directions).


Sunday, December 28, 2008

Another Update on Gourd rattle


Here are some more pictures showing the progress in the making a Gourd Rattle using a Buffalo Hump Bone as the handle.

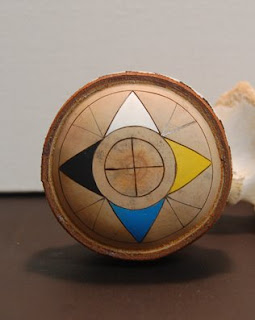
The following pictures show the Gourd part of the rattle which will be inserted into the Bone handle, after the handle is beaded.

I beaded a portion of the Gourd for decoration and also drew on and then wood burned in my version of "The Four Directions" which I then colored with paint and sealed with Lacquer.
I also removed the pencil lines you see on the outer boarder of the Four Direction to simplify the design, as I remembered a saying that Elisabeth told me , it is called "Kiss" meaning "Keep it simple Stupid" a good saying to keep the Artist in reasonable check so as not to get too complicated in an effort to achieve perfection.

Note: I used 11/0 Delica glass seed beads on this Gourd Rattle.


Update on Buffalo bone Rattle


Here is the latest update on the making of a Gourd Rattle using the Buffalo (American Bison) Hump Bone for the handle.

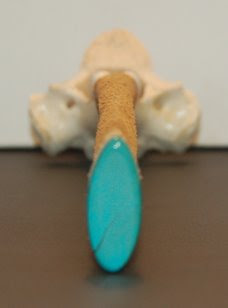
I am including two pictures of the Bone Handle, in which I inlayed a diamond shaped piece of real Turquoise, into each side of the bone.

I also capped the end of the bone with a nice piece of Turquoise that I cut and polished.


Thursday, December 25, 2008

Using Everything

Buffalo Hump Bones


The Traditional Native American way was to live as one with Nature and that all animals winged and four legged are our brothers.


A hunter would go out seeking an animal for food and would ask that animal for forgiveness for killing it, at the same time thanking it for it's gift of life to feed our bodies and clothe us and provide shelter. All of the animal was used, meat, bones, hide, hair, for either food or hides for clothing and shelter even the bones as tools or as something to be decorated.


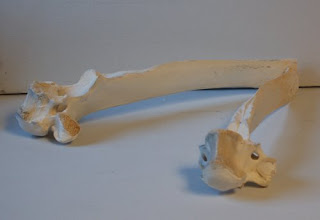
With this way of living and respect and honor for our brother the Buffalo (American Bison) I use every part of the animal that I can and on this project I am using a Hump Bone (located directly behind the neck) consisting of the hump you see on a Buffalo.


I am including a picture of two Hump Bones, one of which I will use as a handle for a Gourd Rattle. I bleach the bone then sand it smooth and polish it till it shines like Ivory. I then cover a portion of the bone with leather to bead on, the rest I leave natural but polished.


I am also including a photograph of some of the Peyote Gourds that I grow, one of which I will choose to be the Gourd part of the Rattle. The upper part of the gourd is placed through the open hole in the Hump Bone and I will draw on and then wood burn on the Gourd my interpretation of the Four Directions which I will use leather dyes to color, or maybe a touch of paint.


In the photograph, I placed one of the bones facing you, there you can see the Spirit of the Buffalo, notice the eyes and even the ears and face?


I will post the progress of this project as it progresses until completion.


Peyote Gourds

Tuesday, December 23, 2008

Thoughts of Spring On a Cold Winter Morning

This morning dawned cold and windy, another freezing cold, but soon to be sunny day.

The temperature is showing 10 deg. on the thermometer on the porch, which means that the wind chill must be somewhere around Zero or minus 4 with the wind whipping around out there.....Brrrrrr.


Our garden, it turns out was a total disaster again this year, even with all the loving care I gave it and all the hand watering I did.

We have a small plot up on the hill just behind the house, which consists of about 3/4 of an acre that I turn into a garden each year, in it I try to grow many different things including my annual gourd crop to use in my Gourd Art projects.

I grow several types of gourds, Birdhouse Gourds,Canteen Gourds, Bushel Gourds, Bottle Gourds,Nigerian Bottle Gourds,and Peyote Gourds on a fence row, even those tiny "Jewelry Gourds" also called "Miniature Gourds".

My usual gourd crop is about 500 gourds of the Birdhouse,Bottle, Canteen and Bushel variety and around 2,000 miniature (Jewelry) gourds and around 200 "Peyote" gourds. The "Peyote" gourds I use to make my gourd rattles with, so I need quite a few , but I do sell some of them in the Raw stage, meaning not cleaned, to other Crafters.

Oh my how I have been rambling here with my thoughts...lol.....anyway, this years gourd crop was a total wipeout again, as it only produced about 10 very stunted gourds and only about 5 "Peyote" gourds that could be used.

Here is hoping that next Spring and Summer will bring some much needed rain to feed the garden and produce a bountiful harvest of veggies and gourds to feed our bodies and inspire our creative Spirits.

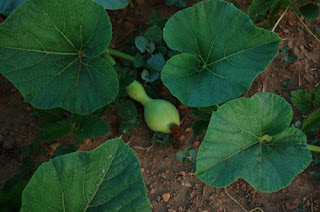
The two photographs above were taken at the very start of the growing season, and show the growth progression of a Birdhouse Gourd, from Baby with the bloom just fallen off to starting to grow into the birdhouse gourd shape.


The Birth and Growth of a Birdhouse Gourd

Saturday, December 20, 2008

"Peyote Gourd Rattle"


This is a Peyote Gourd that I used to make a gourd rattle with.
I cut the upper portion of the gourd and after cleaning out the
gourd, I make a circle of wood to seal off that open portion of
the gourd and make a small hole in the center of this circle to
allow the carved handle to pass through and also drill a small
hole in the end of the gourd to allow the carved handle to pass
all the way through with enough of the wood handle sticking out
to bead and add a bundle of horse hair on the end.

The next step is to cover the entire carved wood handle with thin
leather to bead on and proceed to bead the handle with 10/0
glass seed beads in a pattern that I make and colors I choose.

I also make what is called "Trailers" on the end of the rattle handle
by cutting narrow strips of Deer Leather as decoration.

This sort of rattle is used as a Ceremonial Rattle in a Native
American ceremony.

I am including three pictures of the rattle to show details.


Close Up of Beading On Handle


Close Up of Beading On End of Rattle And Horsehair Bundle

I have noticed a lack of traffic on this blog and also a lack of comments,

it could be the Holiday that causes this, or is it a lack of interest in what I post?

I appreciate your comments and eagerly await your viewing and comments,

but I have almost come to the conclusion that I am just doing this to satisfy

my own need for sharing my Art with others, comments or not but still like them. <>}}:-)

Saturday, December 13, 2008

"Circle of Life"

"You have noticed that everything an Indian does is in a circle. That is because the power of the world always works in circles, and everything tries to be round.... The sky is round, and I have heard that the earth is round like a ball, and so are all the stars. The wind in its greatest power, whirls. Birds make their nests in circles, for theirs is the same religion as ours. Even the seasons form a great circle in their changing and always come back again, to where they were. The life of a man is a circle, from childhood to childhood. And so it is in everything, where power moves...."--


Black Elk, Oglala Lakota

Thursday, December 11, 2008

"Rainy Day Thoughts and Memories"

Goldfinches at Lunch


Today Elisabeth and I went to town and did some "Preseason" shopping for our annual cookie baking. We always get together in the kitchen and bake up a few dozen cookies for the Holiday Season, a task that is harder than it seems on the surface, because in the small log house we live in.......kitchen space is at a premium, meaning that the kitchen is VERY small and for two people to be there at the same time is quite a trick. We take turns turning around and moving from one place to the other, which gives me a chance to sneakingly give her a little squeeze now and then on the pretense of getting by her....lol...but she loves it, even though she pretends to get a bit annoyed at me doing that. (better stop the musing here...lol).

Today dawned as another very rainy day, as was yesterday, except today it was just plain pouring down.

I was not feeling so well today and was having a hard time breathing due to a major flare up of COPD so I didn't even have the energy to go out and work in my workshop for more than an hour, so I came back in and we went shopping together.

After we returned from shopping and getting all the goodies in and put away I decided today would just be a rest day, a time for remembering Spring and Summer and the beauty of our wonderful friends the birds that come to visit one of our two bird feeders.

I decided to put in a couple photographs of a pair of beautiful Gold Finches for our viewing pleasure and to share them with you who come to read my blog every now and then.

Wonderful peaceful memories will follow.


"Let's see...what's on the other side?"


"Oh, yummy...looks like we hit the jackpot!"


"Hey George...I found a nice perch on the Passion Flower Vine."

Monday, December 8, 2008

" Update Beaded Feather Fan Progress"

Fan Handle Completed Beading and Trim Feathers Inserted


Close Up of Upper Beading and Trim Feathers Inlayed

This is the latest progress report on the process of making a Beaded Flat Feather Fan.

I will folow this up with photographs when I get the Hawk Feathers put into the handle,

there are 5 Hawk Wing feathers to be inserted to make the fan.

Saturday, December 6, 2008

"Festival of Lights"

To view the Photographs in this Challenge, Click the link below
My entry for this Challenge is below..you may click on the photograph to enlarge it and see all the details.
I know this is not a Hanukah photograph, but it does represent the seasons festival of lights here
in the mountains of North Carolina.
I missed putting the photograph in for the previous contest, so I am putting it in this one, meaning no offence to either Jewish or Christian peoples, as I really don't celebrate either
Holiday Christian or Jewish.
Please see the December 3 entry as "Christmas Lights" below as my entry .

Wednesday, December 3, 2008

"Christmas Lights"


Christmas Lights 2008

Click on the Image to enlarge


Just down the road from where we live, there is a man that puts out
an amazing array of lights and decorations every year and allows
people to drive through his property to view all his decorations
which are all over his rather large property, all free of charge.


I decided to go down and set up my camera on a tripod in the field across the road
from his property and take a few photographs when it got dark tonight.


Here is one of the shots I took just at dark, while I could still see just a little to walk in the
field across the road from this display.


I used my Nikon D50 SLR camera, with a 55-200mm lens and set the camera on Manual setting, Bulb, F16 and held the shutter for 15 seconds.

This was an experiment, as I had never taken any photographs in the dark .
I believe it came out pretty good . Next time I may try the 18-55 lens and see how it comes out.

Sunday, November 30, 2008

Feather Fan Process

Here is a short explanation of the process for making a Flat Feather Fan.


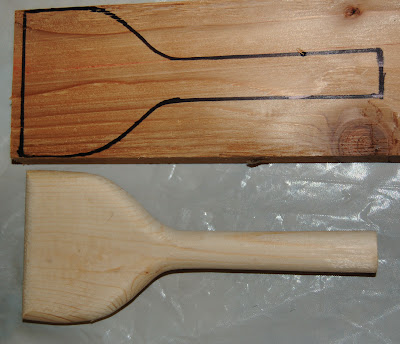
Take a Cedar board, 3 Inches wide by 1 inch thick and mark a pattern on it as shown in photo.


Next step is to cut the pattern out and then using a wood rasp and files, shape it, then sand smooth.


Next step is to cover it with soft thin leather to bead on.

I then use a beading stitch called "Peyote Stitch" which consists of anchoring the first bead on

the string to the leather, after which you skip a bead and add a bead till you get all the way around.


After that you add a bead every time you come to a lower bead...one bead at a time and create your pattern by count.


I will add Photographs as the beading progresses and until the Fan is completed.

It takes about two to three weeks of beading to complete the handle.


See below examples of the layout of the handle, shape of handle, and beading.


Example of Handle Layout


Handle Cut Out , Shaped and Sanded


Example Of Beaded Lower Part Of Handle

Friday, November 28, 2008

"Artist's Guilt"

The Subject today is "Artist's Guilt". Now you may ask, what in the world is he talking about ?.

As an Artist I feel I must be creative Every day, but sometimes I take the day off and just
mess around or rest, but there is that nagging feeling of guilt that I am not out in my workshop
working and creating something new or continuing on with the current project.

Why is this the "Curse" of the Artist ?

Is it that we must constantly be creating ? Is it the feeling that "Idle Hands are the Devils Workshop" ?. What brings on these feelings? Is it our upbringing ?, or just the crazy mind of an Artist ?

Do any of the rest of you get these feelings, or am I alone in this ?

I for one have a constant feeling of "Guilt" if I am not doing something "Artistic "all the time.

We, Elisabeth and I, took the day off from "Art" yesterday and had a day of "Companionship".
We together prepared a Thanksgiving meal and sat down together to enjoy it after we had prepared it and then just mostly just sat around and talked and I played on the computer
playing some games ( Casino Games ) and she played with some Art Journals .
But I still had that "Guilty" feeling all day that I was not out in the shop continuing the beading on that new Feather Fan Handle that I am in the process of completing.

I think I may take a few pictures of the "Process" of doing a Feather Fan from start to finish and maybe share it with my friends and followers. What do you think?..Would anyone be interested in seeing that ?

"Create, Create, Create" My thoughts for today.

Tuesday, November 25, 2008

" Great Blue Heron Gourd"

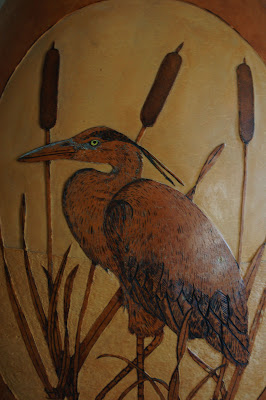
" Great Blue Heron" Gourd Art

I would like to show you a challenging piece I did some time ago, and tell you a little about it here and show you a few photographs of it.

This is one of my gourds that I grew , a large bottle gourd and one of the thickest gourdsI have ever seen or grown.
After the end of the season and after the first Hard frost , I cut the vine loose from the gourd leaving a piece of the vine attached to the top and placed the gourds on a wooden pallet out in the garden to dry over the winter. As winter goes on I go out to the pallets every few days and turn the gourds so that they dry evenly and air can circulate around the entire gourd. Gourds dry out thru the hard shell and also the stem left on the gourd. The gourds sweat out the moisture that is inside and sluff off the waxy skin that covers the outside, thus exposing the hard outer shell. The gourds also get moldy and mildewed on the outside as they dry out, which has to be washed and scrubbed off when they are fully dry, I do this by placing them in a big tub of water with some bleach in it and let them soak for about 20 to 30 minutes, then use a stainless steel kitchen pot scrubber to scrub off any remaining waxy skin and the mold and mildew and it leaves a nice clean hard shell surface with some patterning from the mold and mildew.

I drew on the shape of the cutout for the top and proceeded to cut it out in a patterned shape, after which I cleaned out all the inner membranes and seeds that are inside and then scraped and sanded the inside clean and smooth. I then drew on all borders near the top and wood burned in the cutout pattern. Next it was time to draw on the Great Blue Heron and cattails and boarder the drawing with an oval shape.

Next step was to wood burn in all the bordering, the Heron and cattails. After all the wood burning was done, I next carved away all the hard shell of the gourd from around the Heron and cattails and left the water area with some roughness to assimilate moving water and above the water line, I sanded smooth all the carved area within the oval. The carved area is about 1/16 of an inch deep, thus leaving the Heron and cattails standing in relief.

The next step was to use a light brown leather dye over the whole hard gourd shell and use some leather dyes on the Heron and cattails, such as a bit of shading at the base of the cattails and the legs of the Heron and some on the Heron it self.

The Gourd stands 20 1/2 inches tall with the top on and is 11 inches wide and sits on a steam bent ring that is 2 1/2 inches tall and 10 inches wide.


Note: The gourd after cleaning out and sanding smooth inside is still a full 1/2 inch thick.


Gourd With Top Off


Close Up Of Heron


A closer view of Heron

" Clouds "


Morning Clouds


I took this photograph a few weeks ago and just had to share it with my friends and followers.


There appeared in the sky early one morning the most amazing cloud patterns I have ever seen ,

with the exception of a Tornado forming or a massive Thunder Storm.


I never cease to be amazed at what beauty can form in the sky and the various views that can be seen at different places in the sky at the same time.


Please see below two more pictures of the same sky from a different view.....simply amazing isn't it?


Amazing cloud patterns


More of The Same

Sunday, November 23, 2008

"Morning Glory's and Squash Blossoms"


Morning Glory Field

This year was our Seventh year of drought here in the North Carolina mountains.

We have a 3/4 acre garden plot where I grow veggies and gourds ....or I should say " I TRY "
to grow things....however the past seven years of drought have made it quite a task with any growth.

Labor intensive hand watering did produce a few stunted products, but the Gourd Crop was a total failure again this year....if my supply keeps dwindling..I will have to start buying gourds to continue my Gourd Art.

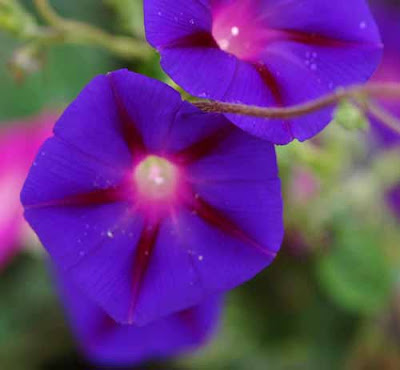
Regardless of the drought, some things will grow every where you don't want them to grow, like Weeds..... and the very invasive Morning Glory. This wonderful blooming flower with it's massive spread of vines took over the whole upper portion of the garden and produced the most spectacular blanket of blooms I have ever seen.

Look at the photograph above to see just a bit of what I am talking about.

Now.....I am going to put in for our viewing pleasure, some close up shots of the different Morning Glory's that grew there...... Oh yes...I couldn't resist putting in One shot of a bee in a Squash Blossom that managed to grow in that sea of Morning Glory's.


Wonderful Blue Flower


"Just a bit closer please"


Another of Natures Wonders

Apache Squash Blossom With Bee

Saturday, November 22, 2008

"Cougar Gourd Art"

Front View


This is one of my Gourds that I grow for my Gourd Art.


I chose this nice gourd for it's shape and thickness and after cutting out the top, cleaned out


the inside and sanded it smooth, then I proceeded with the layout of the art.


I first sketched on the boarders of the top and panels for the Cougars. Next step was to draw on


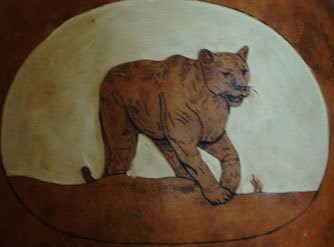
the Cougars on the front and the back side with pencil, then wood burn in each portrait.


Next I decided to carve away the area surrounding the upper portion of the Cougar picture and sand that area smooth, leaving it the natural color of the gourd under it's hard shell.


I repeated this process with the Cougar on the back of the gourd and used leather dyes for colors.


Below I will show close up pictures of the Cougars as they appear on the gourd.


Shown With Top Off


Close Up Of Front Panel


Close Up Of Rear Panel

Thursday, November 20, 2008

"Eagle Gourd"


One of My Favorite Gourds I made


Close Up Of Front Panel

Close Up Of Another Panel


Close Up another Panel....Eagle Head


Close Up Of Fourth and Final Panel

My love of Eagles and my Native American name of Eaglesbrother,

was my inspiration for this Gourd Art piece.

After cutting out the top of the raw gourd and cleaning it out and sanding the inside smooth,

I took pencil in hand and started to sketch out the designs and circles (panels) with different pictures of Eagles in each panel. I then started wood burning in all boarders and pictures

and after all burning was done, went back to each panel and used all leather dyes to color .

I think I enjoyed doing this one most of all because I honor the Eagle above all other birds of prey. There are 4 Panels in all, each with it's own Eagle Portrait.

Tuesday, November 18, 2008

"Rusty Memories"


1941 Car


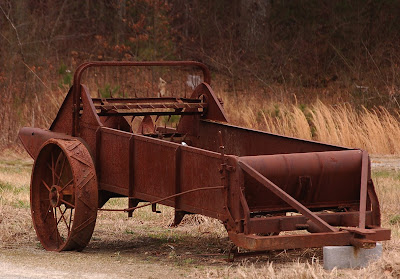
Now that I am older, I still have memories of shiny cars of my youth, but here are some Rusty Memories that I now see.

As we get older our memories rust, our bones squeak and creak and even some of our memories fade. With photographs we can still look back on what used to be, go with me on my memory journey and see if you remember these things as I do.


Frontal Shot of 1941 Car


Old Abandoned Homestead


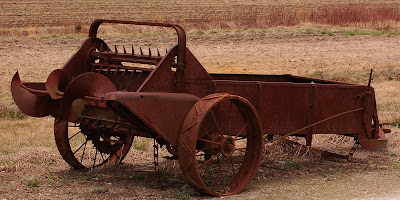
From The Farm.... Old Manure Spreader


A Different View


I hope you enjoy the trip down Memory Lane.